Must-Have MacBook Accessories: Complete Guide for 2026
Finding the right must-have MacBook accessories can transform your laptop from a capable machine into a productivity powerhouse. I’ve been using MacBooks for over eight years, and I’ve learned that the right accessories don’t just add convenience—they genuinely change how efficiently you work, create, and stay organized. Whether you’re a student, creative professional, or business user, the accessories you choose directly impact your daily experience.
The MacBook accessory market has exploded in recent years, with thousands of products claiming to be essential. The truth is, most of them are unnecessary gimmicks that clutter your workspace and drain your wallet. After testing countless accessories and making plenty of expensive mistakes, I’ve identified which ones actually deliver meaningful value and which you can safely skip.
In this comprehensive guide, I’ll share the accessories that have genuinely improved my MacBook experience, explain why each one matters, and help you decide which investments make sense for your specific needs. We’ll cover everything from protecting your investment to maximizing productivity, all while keeping your budget in mind. Let’s explore the accessories that truly make a difference.

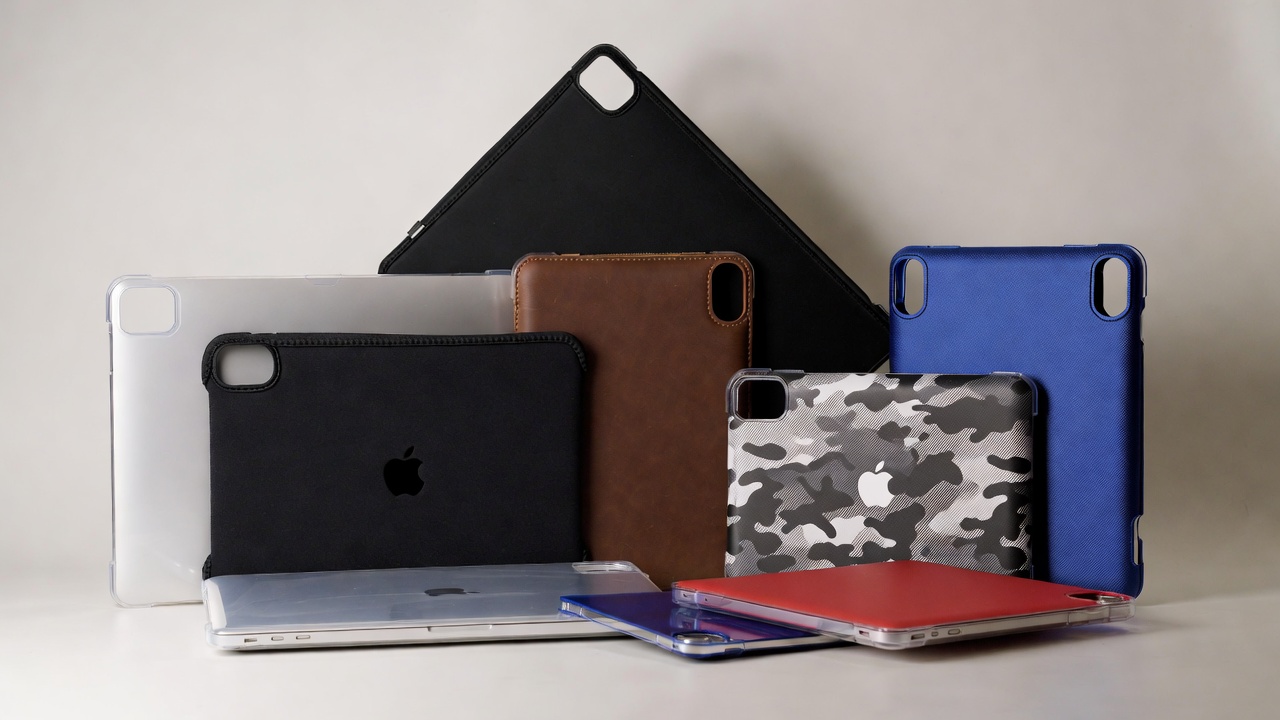
Essential Protection: Cases and Sleeves
Your MacBook represents a significant investment, and protecting it should be your first priority. I learned this lesson the hard way when I dropped my first MacBook Pro without a case, resulting in a dented corner and a $400 repair bill. Since then, I’ve never used my laptop without proper protection.
A quality hardshell case provides daily protection against scratches, minor drops, and spills without adding significant bulk. Look for cases made from durable polycarbonate that snap securely onto your MacBook’s top and bottom. The best ones feature rubberized feet to prevent slipping and ventilation cutouts to maintain proper airflow. I particularly appreciate cases with textured finishes that improve grip and resist fingerprints.
Sleeves offer a different kind of protection—they’re perfect for transportation between locations. When I’m traveling or commuting, I always use a padded sleeve inside my backpack. This dual-layer protection has saved my MacBook from damage multiple times when other items in my bag shifted during transit. Memory foam or neoprene sleeves provide excellent cushioning while remaining lightweight and affordable, typically costing between $15-40.
For those who frequently work in coffee shops or shared spaces, consider a privacy screen protector. These accessories not only protect your display from scratches but also prevent visual hacking by limiting viewing angles. It’s a simple addition that provides both physical and digital security, especially valuable if you handle sensitive information. The investment of $30-60 pays for itself in peace of mind.
Connectivity Essentials: Hubs and Adapters
Modern MacBooks prioritize sleek design by including only USB-C/Thunderbolt ports, which creates an immediate need for connectivity solutions. This design choice frustrated me initially, but I’ve come to appreciate how a quality hub transforms those limited ports into a complete workstation. If you’re exploring more laptops and tablets options, you’ll find similar connectivity challenges across the industry.
A USB-C hub is arguably the single most important accessory for any MacBook user. The right hub provides multiple USB-A ports, HDMI output, SD card readers, and pass-through charging—all through a single connection. I use a 7-in-1 hub daily that includes three USB 3.0 ports, HDMI 4K output, SD and microSD readers, and 100W power delivery. This setup handles everything from transferring photos to connecting external displays without juggling multiple adapters.
When selecting a hub, prioritize build quality over price. Cheap hubs overheat, disconnect randomly, and can even damage your MacBook’s ports. I learned this after a $20 hub fried one of my Thunderbolt ports, resulting in a $350 logic board replacement. Premium hubs from reputable manufacturers cost $50-100 but include aluminum construction, proper heat dissipation, and circuit protection that safeguards your expensive laptop.
For specific use cases, dedicated adapters sometimes work better than all-in-one hubs. If you frequently present or connect to external displays, a standalone USB-C to HDMI adapter provides more reliable performance than hub-based solutions. Similarly, photographers benefit from dedicated SD card readers that offer faster transfer speeds than hub-integrated versions. Assess your actual needs rather than buying adapters “just in case”—I have a drawer full of unused adapters that taught me this lesson.
Display Enhancement: External Monitors and Stands
While MacBook displays are excellent, an external monitor dramatically expands your workspace and improves productivity. Since adding a 27-inch 4K monitor to my setup two years ago, I estimate my efficiency has increased by at least 30%. The ability to have multiple windows visible simultaneously eliminates constant app switching and mental context switching.
Choosing the right monitor depends on your primary use case. For general productivity and content consumption, a 27-inch 4K IPS display offers the sweet spot of screen real estate, resolution, and affordability, typically costing $300-500. Creative professionals should prioritize color accuracy and consider monitors covering 99% or more of the sRGB color space. If you’re interested in display technology, check out our guide on PC builds and components for more insights on choosing displays.
Don’t overlook the importance of a quality laptop stand. Elevating your MacBook to eye level prevents neck strain and improves posture during extended work sessions. I use an aluminum stand that matches my MacBook’s aesthetic while providing excellent stability and ventilation. Adjustable stands offer flexibility for different seating positions and viewing angles. Look for models with rubber pads that protect your laptop’s bottom and prevent slipping, typically available for $30-60.
If you’re working with a single external monitor, consider using your MacBook as a secondary display rather than closing it in clamshell mode. This arrangement gives you even more screen space for toolbars, communication apps, or reference materials. However, if you prefer a cleaner desk setup, clamshell mode works beautifully—just ensure your MacBook has adequate ventilation to prevent overheating during intensive tasks.

Input Devices: Keyboards, Mice, and Trackpads
MacBook keyboards and trackpads are industry-leading, but external input devices offer ergonomic benefits and customization options worth considering. After developing wrist pain from extended laptop use, I invested in ergonomic peripherals that completely eliminated my discomfort within weeks.
An external mechanical keyboard provides superior typing comfort and customization possibilities. I switched to a wireless mechanical keyboard with low-profile switches two years ago, and the improvement in typing speed and comfort was immediately noticeable. Quality mechanical keyboards cost $80-150 but last for years and make the typing experience genuinely enjoyable. Look for models with Mac-specific layouts that include Command and Option keys in the correct positions.
While the Magic Trackpad 2 is excellent, many users prefer mice for precision work. I use both depending on the task—trackpad for general navigation and gestures, mouse for detailed design work and gaming. Ergonomic mice designed to reduce strain come in vertical and contoured designs that maintain your hand in a more natural position. If you’re into gaming accessories, you’ll find that many gaming mice also work excellently for productivity with their precise sensors and customizable buttons.
The Magic Trackpad 2 deserves special mention as one of Apple’s best accessories. If you’re using your MacBook in clamshell mode with an external keyboard, adding this trackpad maintains access to all the multitouch gestures you’re accustomed to. The large glass surface and pressure-sensitive Force Touch capabilities make it feel like a natural extension of your MacBook. At around $130, it’s expensive but transforms a desktop setup into something that feels truly Mac-like.
Wireless connectivity is crucial for maintaining a clean desk setup. All my input devices use Bluetooth, eliminating cable clutter and allowing flexible positioning. Ensure any peripherals you purchase support Bluetooth 5.0 or newer for reliable connectivity and minimal latency. Battery life varies significantly between devices—prioritize models offering at least one month of use per charge to avoid constant recharging annoyance.
Audio Upgrades: Headphones, Speakers, and Microphones
MacBook speakers are surprisingly good for laptop audio, but dedicated audio accessories elevate your listening and communication experience significantly. As someone who spends hours in video calls and enjoys music while working, investing in proper audio equipment has dramatically improved my daily experience.
Quality headphones are essential for focused work, especially in noisy environments. I alternate between over-ear noise-canceling headphones for deep focus sessions and wireless earbuds for mobility and video calls. The AirPods Pro integrate seamlessly with macOS, automatically switching between devices and offering excellent active noise cancellation. For audiophiles, dedicated studio headphones provide superior sound quality, though they lack the convenience features of AirPods.
External speakers transform media consumption and add life to music listening. I use a compact Bluetooth speaker system that delivers surprisingly rich sound from a small footprint. For serious audio work or music production, studio monitors offer accurate sound reproduction essential for mixing and mastering. Prices range from $50 for basic Bluetooth speakers to $300+ for quality studio monitors, depending on your audio needs and budget.
A dedicated external microphone is crucial if you regularly participate in video calls, record podcasts, or create content. MacBook built-in microphones are adequate but lack the clarity and noise rejection of dedicated USB or XLR microphones. I upgraded to a USB condenser microphone for $80, and colleagues immediately noticed the improvement in call quality. For content creators, this investment directly impacts production value and professional perception.
Consider your listening environment when selecting audio accessories. Open-back headphones offer superior sound quality but leak audio, making them unsuitable for shared spaces. Closed-back designs provide better isolation for office environments. Similarly, powerful speakers might disturb others, while personal audio solutions like headphones offer more flexibility in various settings. Match your accessories to your actual usage context rather than pursuing absolute audio quality at the expense of practicality.

Storage Solutions: External Drives and Cloud Services
MacBooks ship with limited internal storage, making external storage one of the most practical must-have MacBook accessories. I’ve gone through several storage solutions over the years, learning which approaches work best for different scenarios and budgets.
Portable SSDs offer the best balance of speed, capacity, and portability. I keep a 1TB external SSD permanently connected to my MacBook via USB-C, using it for Time Machine backups, large project files, and media libraries. Modern NVMe SSDs reach read speeds over 1000MB/s, making them feel nearly as fast as internal storage. Prices have dropped dramatically—quality 1TB portable SSDs now cost $80-120, making them accessible for most users.
For massive storage needs or archival purposes, traditional external hard drives remain cost-effective. A 4TB portable HDD costs around $100, offering four times the capacity of a similarly priced SSD. The trade-off is significantly slower performance and greater fragility due to moving parts. I use HDDs for archiving old projects and storing large video libraries that don’t require frequent access. They’re perfect for data you need to keep but rarely use.
Cloud storage complements physical drives by providing accessibility from any device and automatic synchronization. I subscribe to iCloud+ for seamless integration with macOS and cross-device file access. However, don’t rely exclusively on cloud storage—internet outages, subscription lapses, or service issues can lock you out of your files. A hybrid approach using both cloud and local storage provides the best reliability and flexibility. Learn more about managing your digital ecosystem through our operating systems guide.
Network Attached Storage (NAS) devices offer advanced users centralized storage accessible throughout their home network. I set up a 2-bay NAS with 8TB of redundant storage for automatic backups, media streaming, and shared family photos. While more expensive initially ($300-500 for the NAS plus drives), this solution provides professional-grade data protection and incredible convenience for households with multiple devices.
Power Management: Chargers, Cables, and Battery Packs
Reliable power accessories ensure your MacBook stays operational whenever and wherever you need it. I’ve experienced the frustration of dead batteries during critical presentations and frayed cables that stop charging—these experiences taught me the value of quality power accessories.
A second charger eliminates the annoyance of packing and unpacking your adapter daily. I keep one charger permanently at my desk and another in my laptop bag, ensuring I’m always prepared regardless of location. Third-party GaN chargers offer compact designs with multiple ports, allowing you to charge your MacBook, phone, and other devices from a single adapter. Quality multi-port chargers cost $50-80 but consolidate your charging needs beautifully.
USB-C cables vary dramatically in quality and capability. Not all USB-C cables support the power delivery and data transfer speeds your MacBook requires. I learned this after buying cheap cables that couldn’t handle 100W charging or caused intermittent disconnections. Invest in certified USB-C cables from reputable manufacturers—spending $20-30 on a quality cable prevents frustration and potential device damage. Look for cables rated for at least 100W power delivery and USB 3.1 data speeds.
Portable battery packs extend your MacBook’s runtime when outlets aren’t available. Modern power banks with USB-C Power Delivery can charge MacBooks just like wall adapters, providing 30-50% battery capacity depending on the power bank’s size. I carry a 20,000mAh power bank when traveling, which provides roughly one full MacBook charge plus several phone charges. These devices cost $60-120 and eliminate range anxiety during long flights or outdoor work sessions.
Cable management accessories keep your workspace organized and prevent cable damage from tangling and strain. I use magnetic cable clips attached to my desk edge to route and secure cables neatly. Cable sleeves bundle multiple cables together, creating a cleaner aesthetic and preventing the cable spaghetti that inevitably develops. These small investments (usually under $20) dramatically improve your workspace appearance and reduce time spent untangling cables. For a complete tech setup, explore our home automation section for integrated cable management solutions.
Productivity Enhancers: Webcam, Lighting, and Organization
The shift to remote work has elevated certain accessories from nice-to-have to essential status. Professional-quality video presence and organized digital workflows now directly impact career success and work satisfaction.
External webcams provide dramatically better video quality than MacBook built-in cameras. I upgraded to a 1080p webcam with autofocus and low-light correction, and the improvement in video call quality was immediately apparent. Colleagues and clients perceive you more professionally when your video is sharp and well-lit. Quality webcams range from $60-150, with the sweet spot around $80 for excellent 1080p performance. If you’re serious about content creation, explore options in our gadgets section.
Lighting transforms video quality more than almost any other factor. I use an LED ring light positioned behind my monitor, which eliminates shadows and provides flattering, even illumination. The difference between natural lighting and proper LED lighting is remarkable—my face appears clearer, colors are more accurate, and the overall presentation becomes more professional. Decent ring lights start around $30, making this one of the most cost-effective upgrades for video presence.
Desk organization accessories prevent clutter and improve focus. A simple desk pad provides a defined workspace, protects your desk surface, and adds a premium feel to your setup. I use a large leather desk pad that accommodates my laptop, mouse, keyboard, and notebook while adding visual cohesion to the space. Cable management boxes hide power strips and excess cable length, maintaining a clean appearance that reduces visual distraction.
Document stands or tablet holders position reference materials at eye level, reducing neck strain and improving workflow efficiency. I frequently reference physical documents and use my iPad as a secondary display, both of which benefit from dedicated stands. These accessories cost $15-40 and dramatically improve ergonomics compared to laying materials flat on your desk.

Smart Home Integration and Advanced Accessories
Your MacBook can serve as the control center for a comprehensive smart ecosystem. I’ve gradually built an integrated setup where my laptop seamlessly interacts with smart home devices, creating workflows that boost productivity and convenience in surprising ways.
Smart lighting controlled through your MacBook enhances both productivity and ambiance. I use Philips Hue bulbs throughout my office, controlling them via HomeKit and creating scenes optimized for different tasks—bright white light for focused work, warm tones for evening reading, and colored accents for video calls. The ability to control lighting without leaving my desk might seem trivial, but it genuinely improves my daily workflow. Discover more integration possibilities through our smart lighting and security guide.
Voice assistants transform how you interact with your MacBook and connected devices. While Siri is built into macOS, devices like HomePod or Amazon Echo offer superior voice control for smart home functions, music playback, and quick information retrieval. I use voice commands to set timers, control music, and manage my calendar without interrupting typing flow. Learn more about optimizing these tools in our voice assistants section.
Automated backups and workflows protect your data and save time. I use a combination of Time Machine for full system backups, cloud sync for critical documents, and automated scripts that organize downloads and files. Setting up these systems takes initial effort but provides ongoing peace of mind and efficiency gains. Smart home integration extends this automation to your physical environment, creating a truly integrated digital lifestyle.
Advanced users should explore automation tools like Shortcuts and AppleScript to create custom workflows. I’ve automated repetitive tasks like formatting screenshots, backing up specific folders, and organizing files by type or date. These automations save hours monthly and reduce the mental overhead of routine tasks. While these capabilities don’t require physical accessories, they represent the logical evolution of maximizing your MacBook’s potential. For software recommendations, visit our essential software page.
Budget-Friendly Alternatives and Money-Saving Tips
Building a complete accessory collection doesn’t require spending thousands of dollars. Through trial and error, I’ve identified where to invest and where budget options perform nearly as well as premium alternatives.
Cases and sleeves represent areas where budget options often suffice. While premium brands charge $50-100 for sleeves, well-reviewed alternatives from lesser-known manufacturers cost $15-30 and provide comparable protection. I’ve used both, and the primary differences are branding and minor aesthetic details rather than actual protective capability. Save money here and invest more in accessories that directly impact performance and productivity.
Multi-device charging solutions eliminate the need for multiple dedicated chargers. A quality GaN charger with three or four USB-C ports costs $60-80 but replaces multiple individual chargers. I use one multi-port charger to power my MacBook, phone, tablet, and wireless headphones, significantly reducing both cost and clutter compared to separate chargers for each device.
Consider refurbished or previous-generation accessories when appropriate. Apple’s refurbished store offers certified products with full warranties at 15-20% discounts. Third-party accessories from the previous year often see price cuts of 30-50% when new models launch, despite minimal functional differences. I’ve saved hundreds of dollars by purchasing “last year’s model” accessories that perform identically to current versions.
Prioritize accessories based on your actual usage patterns rather than aspirational scenarios. I’ve wasted money on accessories I thought I’d use but rarely touched—a fourth monitor, specialized gaming peripherals, and overly complex cable management systems. Start with essential accessories that address your current needs, then expand gradually as you identify genuine gaps in your setup. This approach prevents expensive mistakes and ensures every purchase delivers value. Stay updated on the latest tech trends through our news section to make informed purchasing decisions.
Conclusion
The must-have MacBook accessories that truly matter are those that solve real problems in your daily workflow. Protection, connectivity, ergonomics, and productivity enhancements form the foundation of any effective accessory collection. Whether you’re investing $200 or $2,000 in accessories, focus on items that address your specific needs rather than accumulating gadgets that look impressive but rarely get used.
Start with the basics—proper protection, reliable connectivity through a quality hub, and ergonomic input devices that prevent strain during extended use. These foundational accessories provide immediate value and protect your significant MacBook investment. Then expand strategically based on how you actually use your computer, whether that’s creative work requiring color-accurate displays, remote work demanding professional video presence, or mobile productivity needing portable power solutions.
Remember that the best accessories are those you use daily without thinking about them. They should enhance your experience seamlessly rather than requiring constant adjustment or creating new problems. Take time to research, read reviews from actual users, and start with one or two high-priority accessories before building your complete setup. Your perfect accessory collection will evolve with your needs, and that’s exactly as it should be. Invest wisely, and these accessories will serve you well for years to come.
🛒 Recommended Products for Must-Have MacBook Accessories
Based on the must-have MacBook accessories discussed in this article, we’ve curated a selection of top-rated products that deliver exceptional performance and value. These recommendations are carefully chosen to help you implement the solutions that best fit your needs and budget.


- Best Cheap Smartwatch Under $50
 Best Cheap Smartwatch Under $50: 5 Reliable Picks for 2026 By Sanso Uka If you’re hunting for… Read more: Best Cheap Smartwatch Under $50
 - Best Dash Cams of 2026
 Best Dash Cams of 2026: Top Picks for Every Driver and Budget By Wanderson Nogueira Martins Choosing… Read more: Best Dash Cams of 2026
 - How to Transfer Data to New Phone
 How to Transfer Data to a New Phone: A Step-by-Step Guide for 2026 By Sanso Uka Upgrading… Read more: How to Transfer Data to New Phone
 - Senior-Friendly Smartphones 2026
 Senior-Friendly Smartphones 2026: Best Overall Picks for Every Budget By Sanso Uka Senior-friendly smartphones in 2026 have… Read more: Senior-Friendly Smartphones 2026
 - Best Mechanical Keyboards in 2026
 Best Mechanical Keyboards in 2026 Best Mechanical Keyboards in 2026: Top Picks for Every Budget and Use… Read more: Best Mechanical Keyboards in 2026
 - Best Monitor for Home Office 2026
 Best Monitor for Home Office 2026: Expert Picks & Buying Guide By Sanso Uka Your monitor is… Read more: Best Monitor for Home Office 2026
 - How to Extend Smartphone Battery Life
 How to Extend Smartphone Battery Life: 12 Practical Tips That Actually Work By Sanso Uka You unplugged… Read more: How to Extend Smartphone Battery Life
 - Best E-Readers in 2026
 Best E-Readers in 2026: Which One Is Actually Worth Buying? Best E-Readers in 2026: Which One Is… Read more: Best E-Readers in 2026
 - Refurbished vs New Laptop
 Refurbished vs New Laptop: Which Should You Buy in 2026? By Sanso Uka When you’re in the… Read more: Refurbished vs New Laptop